Paper Roller CoastersIntro To Roller Coasters
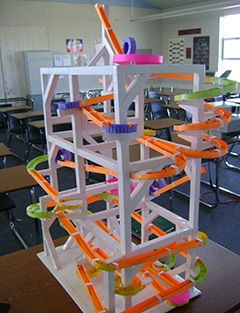
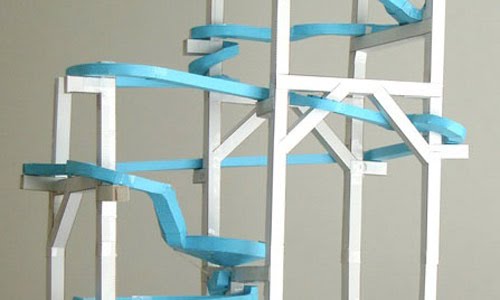
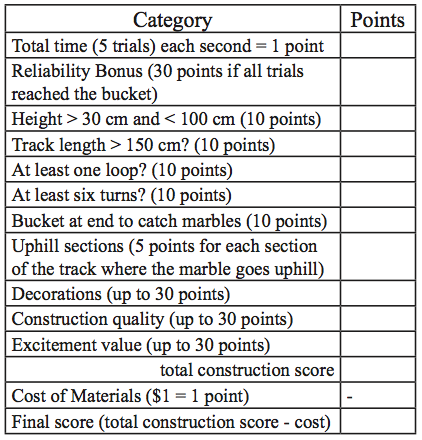
Plan out a rough idea of what your roller coaster will look like (1 class) Based on the instruction booklet (see page 6 for a finished example of a frame) design a frame that you will attach all your pieces to for creating your roller coaster. Supplies I will provide: -exacto blades and scissors -cutting tables -templates for the track pieces (I can photocopy as many as needed) -Rulers Supplies you will need to provide: - A base piece! -Your roller coaster will need to fit through a doorway and be able to handle being moved everyday in and out of storage. Because of this you need a sturdy base! I recommend a piece of plywood or multiple layers of cardboard glued together -My suggested Base size is 12 3/4" x 22 3/4" -With this size, columns can be mounted in the corners of the board and midpoints of the long edges, leaving exactly the right amount of space to attach beams without any trimming necessary. Gather other supplies, such as scissors, rulers, ball point pens, and enough rolls of tape so that each person or group has at least one roll. Use the instruction manual to learn how to build each piece. Practice making each piece so you’ll be able to explain it to your students. Challenge: -The local amusement park has issued a challenge to roller coaster designers to determine who should build their next roller coaster. You’ll need to prove that you can make an exciting roller coaster that meets their requirements, using as little money as possible. Objective: Your Paper Roller Coaster must meet all of the following requirements: 1. height between 30 cm and "130" cm 2. track length must be at least 150 cm 2. at least one loop 3. at least six turns 4. bucket at end to catch marbles 5. decorations 7. Must use at least 6 parts from the "Advanced Kit" 8. Keep the height under 5 feet After you’re done building, we will test your Paper Roller Coaster by placing one marble at a time on it. Record the amount of time that it takes for each marble to reach the bucket at the end of the track. If the marble gets stuck or falls off of the track, write N/A for that trial. |
|

|
|
Timeline for classes:
Day 1 - Choose groups and beginning sketches and design for frame and rough idea of roller coaster. Think exciting!
Day 2 and 3 - Begin cutting out template pieces. Label each piece and assign group members specific tasks to be efficient. Cutter, Folder, Taper, etc
Day 4 - Start assembling frame pieces. It must be strong!
Day 5+ - To be continued!
