02. Drink Can Tinwork
No access to the shop or big fancy tools? No Problem!
You have a choice for which of these listed projects (see my page https://holbrooktech.weebly.com/02-drink-can-tinwork.html for some ideas and choices) you want to try to attempt this week (or any pop can related project!). Most people have aluminum cans of some sort waiting in a box or bag for recycling in their homes. If you are at home and can’t return them to the local bottle depot why not turn them into something nice! Don’t forget to rinse and wash! No need for sticky fingers!
Using a clean aluminum can or two can result in a very cool little storage container. Aside from the decorative design part of this, the most important part of this project is laying out straight lines before you start cutting or getting into it too crazy!
Safety:
Tools required: You may be able to get away with different "tools"
You have a choice for which of these listed projects (see my page https://holbrooktech.weebly.com/02-drink-can-tinwork.html for some ideas and choices) you want to try to attempt this week (or any pop can related project!). Most people have aluminum cans of some sort waiting in a box or bag for recycling in their homes. If you are at home and can’t return them to the local bottle depot why not turn them into something nice! Don’t forget to rinse and wash! No need for sticky fingers!
Using a clean aluminum can or two can result in a very cool little storage container. Aside from the decorative design part of this, the most important part of this project is laying out straight lines before you start cutting or getting into it too crazy!
Safety:
- Edges can get very sharp after being cut. Watch your fingers or temporarily put some tape on the edge so the metal burrs don't get you!
- Don't run with scissors
- Warn those around you that you will be working with heavy duty tools
- Don't wreck your parents kitchen table. Use a neighbors!
Tools required: You may be able to get away with different "tools"
- Tall drink can
- Sandpaper or Steel wool (something abrasive to pull the paint off)
- Ruler
- Semi-Sharpened chopstick or wood Skewer works better than a Pen. Pens leave ink marks!
- Scissors
- maybe some other stuff (watch the video)
- Check out TIPS FROM A TEACHER AT THE BOTTOM OF THE PAGE!
- Follow the Video and try it out for yourself! You can submit photos of your work through the google classroom assignment page!
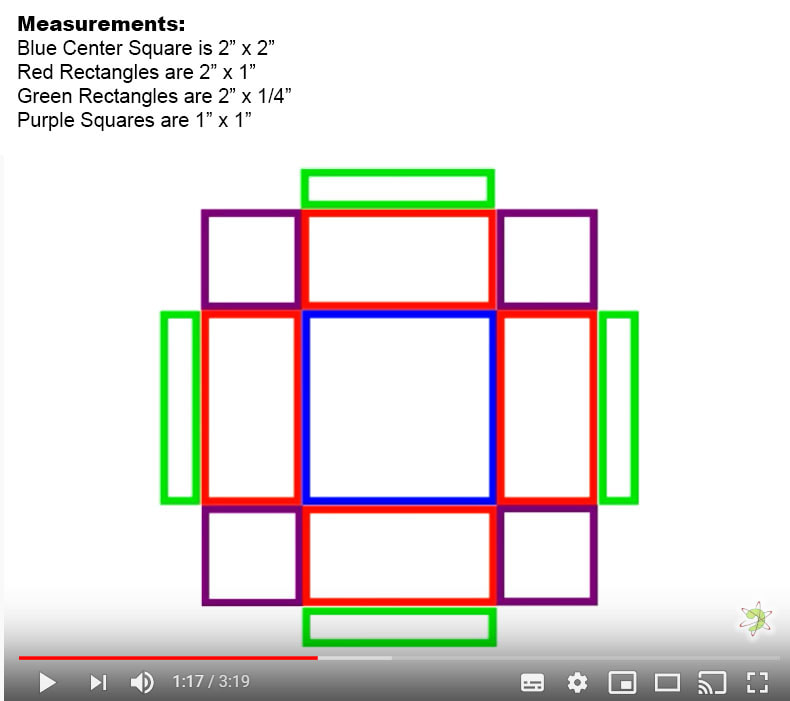
- Minimum you can try this just using paper and show you can setup the layout lines correctly to form a shape shown below. The art style is personal but the measurements are required! Submit a photo(s) of your work (Layout photo, cut and folded photo)!
Project #1 - Container Project
If attempting this with a “regular sized can” try to scale down the sizes as a regular can’s flat part after being cut only give you a 10cm or 4” tall piece. See what you can do!
Tips from another teacher:
Mr. K:
This is a cool project. I have done this technique with kids before successfully. I would replace the pen with a pencil sharpened disposable chop stick if one is available. That way no pen marks. Also if you shape the other end into a blade like paddle you get a great double ended tool. Next I suggest you have kids work out their designs on paper first. Then tape the design onto the blank and from the good side (outside) go over the outlines of the design. You will need 3 types of surfaces. A dead hard surface. We used out laminate classroom desks. A slightly resilient surface achieved by putting 3 or 4 sheets of paper onto the hard surface and working on top of this. And a soft surface. Cork works. We used thin sheets of fun foam from a loonie store which works great. Perform your outline from the outside on the mid soft surface. Remove your paper design. Flip it over and slowly work out the surface inside your likes on the Soft surface. Flip over on the hard surface and go around the outside of all the shapes. This makes them crisp and defined. repeat as needed to achieve the desired result. You can get a very 3d surface this way. I used this idea to make small night lights so we also perforated them outside in with pin pricks. Also once a mark is made it cannot really be unmade. And you must work slowly back and forth so as to not unduly distort the metal.
|
BBQ Skewers work for this instead of a ball point pen. You may go through a few cans before you figure out the technique!
|

|
#2 Pop Can Rose - BONUS!
Sheet metal flowers are one of my favorite metal shop projects (You may have seen the copper rose in the classroom). This is an easier alternative for a project that can be done at home and can incorporate some cool colors that take advantage of the colors and design of the pop can you are using.
Another list just because.....
Would you rather try one of these to suit your style. Go for it. Just document your process and send pics through the google doc
|
|
|
|
|
|
Student Worksheet Downloads:
| 02._drink_can_tinwork_-_student_handout.pdf |
| 02._drink_can_tinwork_-_student_handout.docx |
