Download and print this ITA project!
| makeminishieldletteropener.pdf |
Youth Explore Trades Skill - https://mytrainingbc.ca/youthexploreskills/
Make a Mini Shield and Letter Opener Description
Metal fabrication involves the use of a basic set of skills—cutting, bending, and assembling processes—to create something from raw material. In this activity plan, students will put all the various stages of fabrication to work as they fabricate their own mini shield and letter opener. Teachers will demonstrate equipment and process and the students will follow up by building their own mini shield and letter opener.
Lesson Objectives
The student will be able to:
- Identify common metals
- Demonstrate appropriate shop behaviour
- Demonstrate safe and appropriate use of hand tools and equipment
- Use appropriate layout tools
- Place and rivet components in the correct location
- Demonstrate proficient riveting
Assumptions
The student:
- Has demonstrated previous metallurgical knowledge
- Understands basic layout techniques
- Can perform basic measurement
- Demonstrates safe tool and equipment use
Terminology
Hilt: handle of a tool or sword.
Hilt topper: top section of the handle that separates your hand from the blade.
Estimated Time
5–10 hours
The time for this activity will depend on the familiarity of students with tools and the amount of equipment available.
Equipment/Machinery
- Bench grinder
- Drill press
- Foot shear
- Slip roller
Tools
- Aviation snips
- Ball peen hammer
- Beverly shear
- Whitney punch
- Centre punch
- Scribe
- Permanent marker
- Square
- Steel scale
- File
- Emery cloth
|
How to use a Beverly shear
|
How to use a foot shear
|
|
How to rivet
|
How to use a slip roller. I can show you the basics in under 2 minutes.
|
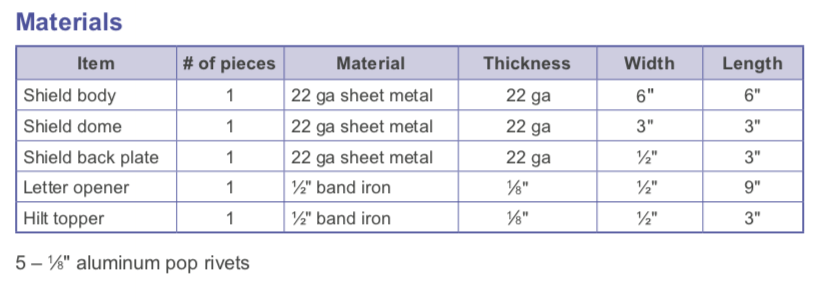
Shield body
Small sword letter opener
- Obtain a piece of 22 ga aluminum sheet metal.
- Teacher demonstrates layout and foot shear safety. Use aviation snips if a foot shear is unavailable.
- Lay out and cut a 6" × 6" square of sheet metal.
- Trace template and cut along layout lines with aviation snips.
- File shield to uniform shape and remove sharp edges.
- Teacher demonstrates slip roller to students. You can leave the shield flat if a slip roller is unavailable.
- Roll shield through slip roller to give shield a slightly convex shape.
- Using emery cloth, sand entire surface of shield.
- Using your thumb over the emery cloth, twist emery cloth to create swirls over the entire surface of the shield.
- Obtain a piece of 1⁄2" sheet metal strip. Measure 3" and cut.
- Use emery cloth to smooth any burrs around edges.
- Cut a piece of aluminum sheet metal 3" × 3" square.
- Clamp a 2" diameter pipe vertically into a vise.
- Centre sheet metal over pipe. Begin peening the centre of sheet metal starting from the centre and moving out towards the edges in circular patterns, to create a dome shape.
- Trace and cut a 3" diameter circle around the dome to leave a 1⁄2" lip around the dome.
- File edges of the circle uniform and smooth.
- Mark out 4 evenly spaced holes around dome.
- Teacher demonstrates Whitney punch. Use 1⁄8" drill bit in hand drill or drill press, if Whitney punch is unavailable.
- Using the Whitney punch with a 1⁄8" die, punch out 4 marks.
- Place the dome on the shield and transfer 4 Whitney punch marks with scribe.
- Assembly of shield
- Use the Whitney punch to punch holes in shield.
- Lay out shield back plate behind two horizontal holes on shield and transfer marks with scribe.
- Use the Whitney punch to punch holes in the backing plate.
- Place a rivet through the dome, shield, and backing plate.
- Place the rivet in a suitable recess of the rivet set and flatten the rivet with a ball peen hammer.
- Rivet the other side of the backing plate.
Small sword letter opener
- 1. 2.
3. 4. 5. 6. 7. 8. 9.
Obtain a piece of 1⁄8" × 1⁄2" flat bar and cut to 9".
File one end of flat bar to 1⁄2" diameter and the other end to a 1⁄8" diameter taper, as per plans.
File 90° notches that are 1⁄8" deep into flat bar, as per plans, to create the hilt. File edges of letter opener blade to a mild chamfer.
Obtain a piece of 1⁄2" flat bar and cut to 3" long to create hilt topper.
Lay out radius lines on hilt topper as per plans.
File to lines to create shape on hilt topper.
Centre punch middle of hilt topper and drill with 1⁄8" drill bit.
Lay out centre punch mark on sword handle as per plans and drill with 1⁄8" drill bit. - TO BE CONTINUED!
