Shop Floor Plan Assignment
Purpose: This activity introduces measurement, scale, and drawing in order to represent an object(s) or room. This will help as we progress in the course and need to read or create our plans, designs, and procedures.
Assignment:
Draw the enter room including "footprints" of machines, tables, tool boards, etc. You do not need to include loose items such as the location of my coffee mug or garbage cans.
You should include the location of safety equipment such as fire extinguishers, fire alarms, big red power buttons, etc.
You will be graded on accuracy, and how clean your drawing looks.
We will be drawing out a map of the room and where tools, machines, tables, etc, is located in the metal shop. This will help you find your way around and learn where to find everything we need over the course of the semester.
We will be drawing to scale and should be working in table groups. Each student will be handing in their own drawing.
Since we cannot draw a full size version of the room we need to draw a scale version that has been shrunk down to fit on our paper.
The metal shop room if drawn as a rectangle is approximately 400 inches wide by 792 inches long.
We will be drawing an above view plan of the room on a piece of paper that is 11 inches by 17 inches.
This means that if an object has a foot print of 22" x 63" (the sink by the shop entrance) you have to draw it .47 inches x 1.35"
How did I get that number? I divided the full size number of 22 by 46.6 to get a final number of .47" (22" / 46.6 = .47)
So basically if measuring in inches you should divide the number by 46.6 to get the measurement you will draw.
On my paper I would figure out where on the page to draw it an put a label on it saying what it is. You can round up or down for the drawing size but we should try to get it close.
DRAW LIGHTLY IN PENCIL FIRST. Use a straight edge or ruler. Use the geometry set. Our goal is to draw a nicely scaled.
You do not need to add measurements to your final drawing but you should have a page of notes or quick sketch of sizes and how big things will be so you can draw them onto your final map at an appropriate scale.
Legend:
A map legend or key is a visual explanation of the symbols used on the map.
Instead of trying to cram all the words and descriptions into the drawing itself you can make a symbol or number and in the legend explain what it actually is. I have labeled a few items in my draft sketch but for some that are crammed close together.
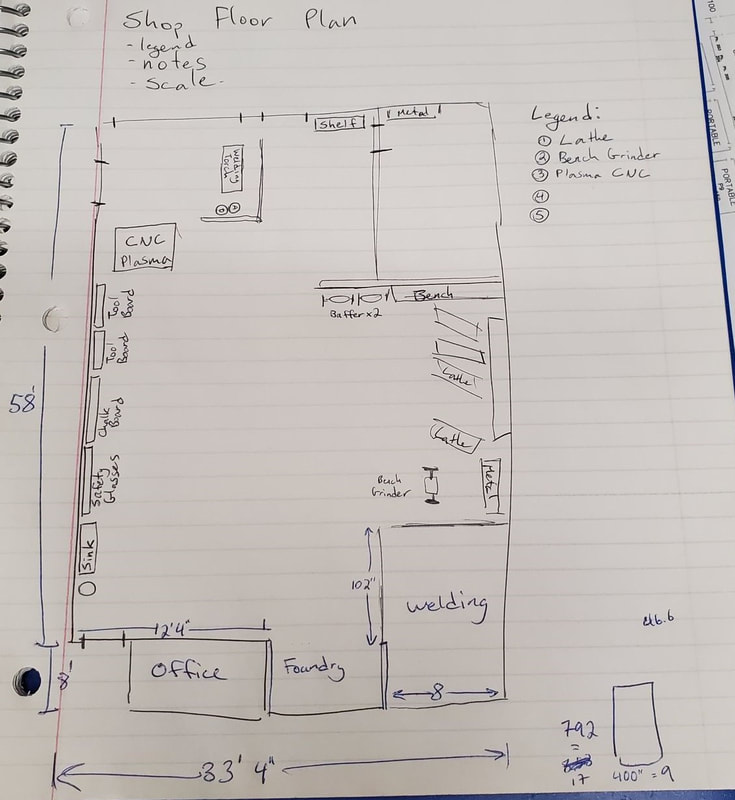
Quick draft sketch of the shop. I didn't fill in everything because that is up to students! I can't give away all the answers!
If you do not know the name of a machine/tool, etc please ask the teacher!
If you do not know the name of a machine/tool, etc please ask the teacher!
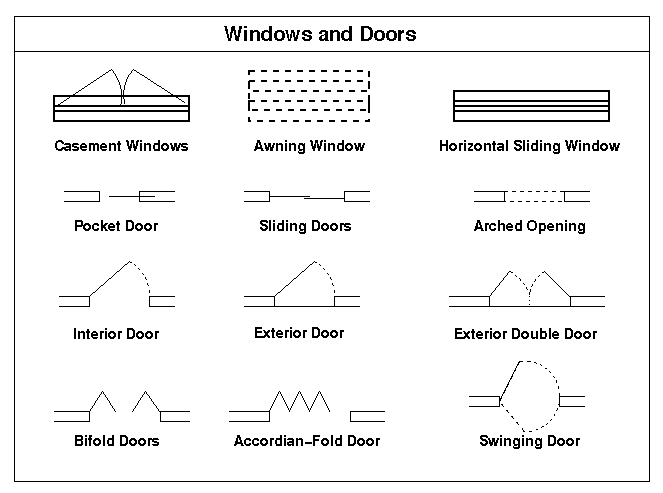
This is how to represent doors and windows. In my sketch you can see that I represented doors with 2 small lines intersecting the wall showing how wide the door is. The main shop door is 36 inches wide so we would draw it 0.77" wide
Imperial or Metric Measurements
|
I am doing my measurements in imperial represented by feet and inches. If you prefer to use metric you are more than welcome. The final drawing should look the same regardless of how you choose to measure.
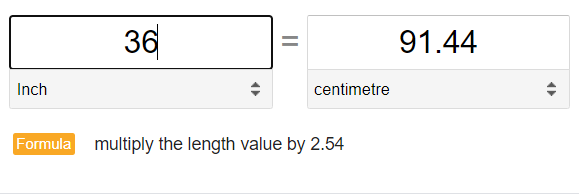
To convert from inches to centimetres you multiple your inch measurement by 2.54 to get your measurement in centimetres. |
|
Using Rulers and measurements are hard!?
If you aren't great at measuring you should practice. Here are some PDFs for when you are bored at home...
|
| ||||
In Class Presentation
| shop_floor_plan_Holbrook.pdf |
