Human Powered VehiclesYour challenge is to create a human powered vehicle powered only by the driver’s arms, legs, or whatever method you choose for movement. No motors! If you need someone to run behind and push that is not going to work for the final competition.
Maximum 5 teams per class
|
| ||||||||
Day 1 - Individual Assignment |
| ||
Individually you will have time in class to begin researching on some specific topics that will relate to your project. Each of these topics should include notes and drawings for how you may relate these topics to helping to build your human powered vehicle. You may bring different skills to your design compared to other group members but you will need to all put in effort in order to complete this year's MAJOR PROJECT.
Every day you will have some more research topics to look into and answer questions. The purpose of these questions is to get you ready for designing your vehicle before you build it! Prepare, Prepare, Prepare!
Today's research topics:
Every day you will have some more research topics to look into and answer questions. The purpose of these questions is to get you ready for designing your vehicle before you build it! Prepare, Prepare, Prepare!
Today's research topics:
- Adapting and using Bicycle gearing for other purposes (easy to pedal gearing vs hard to pedal but more long term speed)
- Weight distribution with multiple people (Quadracycles, etc) vs single riders for human powered machines.
- Steering systems for different types of vehicles. How do these different steering systems work? What principles are required in order for these systems to work for their intended use?
- Horse and buggy/carriage
- Go-karts. What is Ackermann Steering Geometry?
- Kids pedal-karts
- Scooters
- Live axle vs single drive go-karts. What is the difference and why might you choose one or the other?
Day 2 - Bicycle parts and research |
| ||
Human Powered Vehicles
Bicycle info and research! DAY 2
Name: _________________________ Block: _______ Date: _____________________
The majority of you will be taking apart a bicycle for parts to use for your human powered vehicle. Knowing some of the major parts will be useful when researching how to adapt them to your project. You don’t need to have everything memorized but you should still understand how they work. If you plan on using and welding parts of the bike frame it should be steel and not aluminum. We don’t have machines for welding aluminum set up this year.
Vocabulary: Describe what the part/object does or is used for
Axle:
_____________________________________________________________________________
Bearing
_____________________________________________________________________________
Bottom Bracket
_____________________________________________________________________________
Cable Guide
_____________________________________________________________________________
Cartridge Bearing
_____________________________________________________________________________
Cassette
_____________________________________________________________________________
Derailleur
_____________________________________________________________________________
Freehub
_____________________________________________________________________________
Headset
_____________________________________________________________________________
Inner tube
_____________________________________________________________________________
Locknut
_____________________________________________________________________________
Master Link
_____________________________________________________________________________
Spindle
_____________________________________________________________________________
Sprocket/cog
_____________________________________________________________________________
Valve Stem
_____________________________________________________________________________
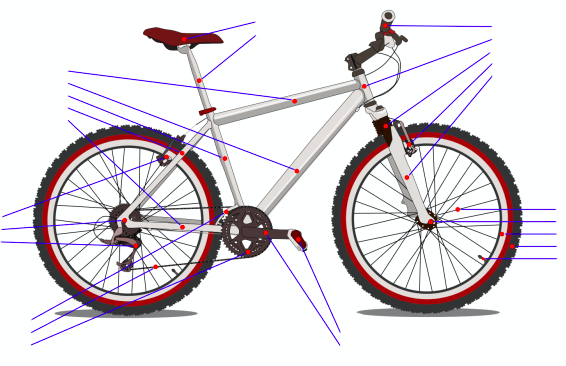
Label the parts on the image below:
Chain stay
Cogset/cassette
Front derailleur
Chain rings
Pedal
Crank arm
Head tube
Hub
Valve
Bicycle info and research! DAY 2
Name: _________________________ Block: _______ Date: _____________________
The majority of you will be taking apart a bicycle for parts to use for your human powered vehicle. Knowing some of the major parts will be useful when researching how to adapt them to your project. You don’t need to have everything memorized but you should still understand how they work. If you plan on using and welding parts of the bike frame it should be steel and not aluminum. We don’t have machines for welding aluminum set up this year.
Vocabulary: Describe what the part/object does or is used for
Axle:
_____________________________________________________________________________
Bearing
_____________________________________________________________________________
Bottom Bracket
_____________________________________________________________________________
Cable Guide
_____________________________________________________________________________
Cartridge Bearing
_____________________________________________________________________________
Cassette
_____________________________________________________________________________
Derailleur
_____________________________________________________________________________
Freehub
_____________________________________________________________________________
Headset
_____________________________________________________________________________
Inner tube
_____________________________________________________________________________
Locknut
_____________________________________________________________________________
Master Link
_____________________________________________________________________________
Spindle
_____________________________________________________________________________
Sprocket/cog
_____________________________________________________________________________
Valve Stem
_____________________________________________________________________________
Label the parts on the image below:
Chain stay
Cogset/cassette
Front derailleur
Chain rings
Pedal
Crank arm
Head tube
Hub
Valve
Begin sketching some thumbnail ideas for what your human powered vehicle might look like. Side views, orthographic, 3d.... just come up with some cool ideas!
|
|
|
|
|
|
|
|
|
Day 3 - hands on time
Today we will be clearing out a storage space for each group, painting lines on the floor, and choosing a 1 bicycle per group to get started with.
Each group will be supplied with a bucket for storing parts. If you loose bike parts it is up to you to source your own. DO NOT CUT CHAIN unless using the proper chain removal tools!
1) Pick a group bike
2) Assign a Bucket
3) Begin Part identification and remove parts
4) End of class keep bike in assigned storage location for your group
Day 4 - Hands on and Design/Research |
| ||
Today will be a mix of the last few days to give you an opportunity to catch up on the two worksheets as well as begin sketching out orthographic plans for your project. You will probably want to start with thumbnail side view sketches and then go into more detail.
Important stuff you have to draw: Your human powered vehicle will be made up from different systems and you will need to have them all working in order to do well with this project
1) Steering system
2) Forward movement system
3) Braking system
4) Human holder system (where do you sit and how will you not fall off of your vehicle???)
While this is a group project each you will be responsible for doing your own individual paperwork and keeping track of all handouts. These will eventually compile a final design package. These booklets might end up the exact same but should be kept by YOU as reference. If a group member is sick or misses a class you should all have the information needed to progress and not waste any days!
Day 5 - Research and Design
Groups should continue with research and designing parts of their project. By the end of class each group should be able to show a side and/or top view of their proposed vehicle drawn full size on blank paper. It should include a rough idea of all 4 main parts (steering, movement system, brakes, human holder).
Day 6 - Progress Marks
-By End of class students need to hand in all paperwork/designs/drawings made so far INDIVIDUALLY!
-Progress mark/credit for work done so far
-Progress mark/credit for work done so far
