youtube.com/webuildstuff
Holbrook Tech
  • Home
  • Woodwork
    • Woodwork 10 >
      • Wood 10 Safety
      • Chopsticks
      • 3 Piece Puzzle
      • Intarsia
      • Clock
      • 01. Tree Id assignment
      • 02. Wood Safety Video
      • Woodshop Safety
      • 00. Wood Work Work Log
      • 04. Wood Artisan Profile activity
      • 05. Woodworking Joints
      • 06. Plywood Manufacturing
      • 06. The Ruler Game
      • 07. Meme project
      • 08. Woodwork Alphabet Assignment
      • 09. Self directed video project - woodwork
    • Level 1 Woodwork >
      • Scrap Wood Birdhouse
      • Wooden Key-racks
    • Level 2 Woodwork >
      • Viking Chair
    • Woodwork Safety >
      • Jointer Safety
    • Pallet Wood Shoe Rack
  • Metal
    • Grade 8 Metal >
      • Metal 8 Course Outline
      • 01. Grade 8 Safety
      • Garden Trowel
      • Grade 8 Rose
      • Do it yourself - Grade 8
      • Self led projects
      • MyEd Core Competencies
    • Metalwork 9/10 >
      • Jr Metal - Course Outline
      • 01. Jr Metal Safety
      • 01b. Safety Posters
      • 03. Weekly Portfolio Google Classroom
    • Sr Metal >
      • Sr Metalwork Course Outline
      • 01. Sr Metal Safety
      • 02. Safety Videos
      • Flat Bar Symbols
      • Weekly Portfolio Google Classroom
      • 03. Metal Product/Artist Assignment
      • Making bank
    • Level 1 Metal >
      • Can Punch/Bottle Opener
      • Tap and Die 101
      • Mini Me
      • Balancing Surfer
      • Rings on a lathe
      • Balancing things
      • Rain Chains
      • Stick Figures
      • Soft Jaws
      • Belt Buckles
      • Pop Can Art
      • Copper Rings
      • PVC Recorder
      • Mini Shield and Letter Opener
      • Metal Rose
      • Figure 9 Rope Fastener
      • Cookie Cutters
      • Steel Hammer Lathe Project
      • Book Ends
      • Christmas Candle Holder
      • Tea Light holders
    • Level 2 Metal >
      • Plasma Signage
      • Sheet Metal Christmas
      • Steel Scribe on Lathe
      • Welded Rose
      • More Welded Roses
      • Lost Foam Casting
      • Center Punch
      • Blacksmith 101
      • Fishing Gear
      • Welding Sculptures
      • Welded Stump with Axe
      • Coat and Key Racks
      • Mini Metal Dumpster
      • Mini Metal Choppers
      • Medieval Shields
      • Hold The Door Stopper
      • Bicycle Repair Stand
      • Spinning Top
      • Christmas Decorations
      • Wind Chime Project
      • Whistle - Lathe Project
      • Steak Brand
      • Tamping Tool
      • T-Post Fence Driver
    • Level 3 Metal >
      • Toolmaker Clamp
      • Rocket Stoves
      • Vehicle Sculptures
      • Adjustable Exercise Bench
      • Welded Die (Dice)
      • Metal Rings with Inlay
      • Lathe Rings extra
      • Sr Sculpture project
      • Metal Bridge project
      • Lathe DICE?!?!
      • DIY SHOP TOOLS >
        • Ring Mandrel
    • CNC Plasma Cutting >
      • Plasma Cutter project #1
      • Designing for CNC Plasma Cutting
      • Inkscape --> Plasma Cutter
      • Raster Images --> Vector
      • SAW BLADE Signs - CNC
      • CNC Air Tool Rack
      • Wall Mount Duotang Holder
      • Ride On Mower Hitch
    • Spinning Tops/Bey Blades
    • Jewelry / Art Metal >
      • Art Metal - Course Outline
      • Welded Sculptures
      • Metal Picture Frame Project
      • Jewelry Stand
      • Cartoon Character - Art Metal
      • Angle Iron Feathers
      • Wire Wrapped Jewelry
      • Copper Art Metal
      • Jewelry Year Plan
      • More Metal Art Ideas!
      • Jewelry 101
      • Rolling Mill
      • Jump Rings
      • Jewelry Ideas
      • Metal Enameling 101
      • Resin Jewelry
      • Epoxy Resin Stuff
      • Cutlery Jewelry
    • Go Karts >
      • Electric Go Kart 2024
      • Electric Go Kart 2025
      • Go Karts
    • Tools and Machines >
      • Plasma cutting Setup (handheld)
      • Horizontal Bandsaw
    • Measurement
    • Metal Misc
    • Welding >
      • Oxy-Acetylene Welding 101
      • MIG Welding Theory
    • Automata >
      • Automata
      • Automata Student Steps
      • Automata Video Page
    • Casting >
      • Lost Wax Casting
      • Lost Foam Casting
      • Ingot Casting
      • SpinCaster Flask Receiver Rebuild
    • Theory Assignments >
      • Lathe Operations
      • Layout Operations Ch5
      • Tool Identification
    • Calculations for shapes >
      • Funnels
    • Cutting Tools
    • BushCraft >
      • Bushcraft Ideas
      • Blanket Pin
    • DIY CNC Plasma Cutter
    • Oil Blackening
    • TTOC VIDEOS
  • Guitar Building
    • Maple Telecaster Build Log
    • Maple Telecaster Build Log Photos
    • Guitar Fret Press Caul
    • Guitar Fret Mitre Box
    • 7 String Explorer Electric Guitar
    • 7 String Explorer Electric Guitar - Part 2
  • Engineering
    • Engineering 8 >
      • Egg Drop Challenge
      • Electronic circuits
      • Spaghetti bridge
      • Marshmallow Catapult
    • Engineering 9 >
      • Wooden Bridge Building
      • Cardboard Castles
      • Trebuchet Part 1
      • Trebuchet Part 2
      • Trebuchet Requirements - Most Important
      • Trebuchet Testing/Mods
      • CO2 dragster
      • Paper Roller Coasters >
        • Roller Coaster science/math stuf
    • Engineering 10 >
      • Stir Stick Structure >
        • Stir Stick videos 2019-2020
        • Stir Stick Structure Videos
      • STEM Invention Project
      • Rube Goldberg Machine
      • 1) Water Rockets - research
      • 2) Water Rockets - Eggstronauts
      • 3) Water Rockets Parachute
    • Engineering 11 >
      • hydraulics and simple machines
      • Egg Gondola
      • 01. Sumo Bots
      • 02. Sumo Bots Timeline
      • Hot Air Balloons
    • Engineering 12 >
      • 01. Mouse Trap Car >
        • Mouse Trap Videos 2019-2020
      • 02. Bring the Hammer Down
      • 03. Careers Presentation
      • 04. Human powered vehicle
      • Strandbeest Vehicles
      • Ping Pong Ball Launcher
      • Biomimicry
      • Biomimicry Presentations
      • Sr Trebuchets
      • Trebuchet Testing
    • 3D Printing >
      • Getting Started with 3D printing
      • TinkerCad
      • Cura Software
      • Fixing Monoprice 3d Printer
    • 3D Made Easy!
    • Drafting
    • AutoCAD
    • Vex IQ >
      • 01. Vex IQ Day 1 Boxes
      • 02. Forklift Challenge
      • 03. Seaquam Ninja Vex Warrior
      • 04. Vex IQ - Robot Wars Capture the Flag
      • ROBOT SOCCER
      • Warehouse worker challenge
      • Vex Programming assignment
      • VEX IQ Unit Debrief
  • Arcades
    • Bigger Bartop Arcade Build
    • Pi Arcade 101
    • Full Size Arcade Cabinet
  • Safety
    • 01. Safety
    • Safety Posters
    • Safety Study Guide
  • Electronics
    • Breadboarding
    • Electronics Projects
  • Media arts
  • Automotive
    • John Bean Tire System
    • Grease Your Trailer Bearings
  • For Teachers
    • Core Competencies ADST
  • Contact
    • Privacy Policy
  • TTOC DAYS
    • Metal Crossword Puzzle #1
    • Heat Treatment Video
    • Mastering Metal Machining

Oxy-Acetylene Welding and setup 101

So it is your first time getting to do some welding?! Here are the basics to get you started! The more you practice and learn the better you will get.
Oxy-Acetylene Equipment Procedures

A before O or up you go
  • Acetylene before Oxygen when lighting the torch
O before A to put it away
  • Oxygen off before Acetylene when turning off the torch
 
Personal Safety Practice 
  • Wear appropriate clothing (closed toe leather shoes, natural fiber clothing,, and gloves)
  • When performing a welding operation wear goggles with #5 shaded lenses.
  • Make sure all combustible materials are away from the welding area.
  • Know the location of the nearest fire extinguisher
  • Keep work area clean
 
Equipment Safety Practice 
  • Store gas cylinders in an upright position… they should be secured to a wall or welding cart with chain so they cannot fall over.
  • Never open the acetylene valve more than one complete revolution
  • When moving or storing cylinders screw the valve covers in place
  • Never oil or grease any fittings or threads on the oxy-acetylene setup
  • Never allow the acetylene line pressure to exceed 15psi
  • Discontinue use if the torch body becomes hot- notify instructor
  • Always finish the shutdown procedure before leaving the work area
  • If hoses light on fire shut off cylinder valves immediately
 Setup For Use - use this guide as a checklist as you are setting up the torch!
  1. Close both torch body valves and back off both regulators (thread out until it feels like there is no load on the screw)
  2. Standing to the side of the regulators (not standing in front of the gauge) open the main Acetylene cylinder valve half a turn (not more than one) 
  3. Open the Acetylene knob (follow the red hose) on the torch to allow for acetylene pressure to be set.
  4. Turn the Acetylene regulator in until the line pressure reads 5-6 psi on the gauge. Close the acetylene knob on the torch.
  5. Open the main Oxygen cylinder valve all the way.
  6. Open the Oxygen knob (follow the green hose) on the torch to allow for oxygen pressure to be set.
  7. Turn the Oxygen regulator in until the line pressure reads 5-10 psi (or if using a cutting torch 5psi acetylene, 20 psi oxygen). Close Oxygen valve on torch handle
  8. Holding the torch body in one hand, and the torch tip facing away from yourself and others, open the acetylene knob/valve (counter-clockwise) on the torch just enough to feel the air blowing on your hand.
  9. Use a striker to light the torch. 
  10. Adjust the acetylene valve so that the flame is slightly smoky. The black sooty stuff is carbon and can make a mess!
  11. Turn on the Oxygen knob/valve (green hose side) and adjust for a neutral flame. The little bright cone should have a slightly feather.
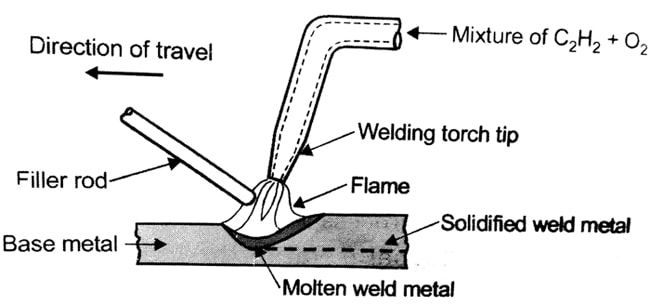
  12. Perform welding operation
  13. To turn off torch close the Oxygen knob/valve first, then the Acetylene. This will help purge the torch of gases
  • Turn off the Acetylene gas first if there is an emergency and if you need the flame off right away. Quickly close the oxygen next.
 
Shutdown/ Storage Procedure

  1. With both the torch body needle valves closed, completely close the valves on the tops of the cylinders.
  2. With the cylinder valves closed, open the needle valves on the torch body and let the line pressure drop to zero (watch the line pressure and cylinder pressure gauges drop)
  3. Close both needle valves on the torch body and back out both regulators to the neutral position (no pressure being placed on internal diaphragm)
  4. Wrap up hoses and put away all accessories
  5. Clean up general work area

Easy 8 Step setup reminder 

1. Open Acetylene Tank valve ½ turn counter clockwise
2. Open Acetylene valve on torch ¼ turn
3. Adjust Acetylene Regulator to between 5-7 psi depending on operation
4. Close Acetylene valve on torch
5. Open Oxygen Tank valve all the way counter clockwise
6. Open Oxygen valve on torch ¼ turn
7. Adjust Oxygen Regulator to around 10 psi depending on operation
8. Close Oxygen valve on torch
 
You are now ready to light the torch as listed in step 8 in the above section.

metalwork_oxy-acetylene_setup_written_test.pdf
File Size: 139 kb
File Type: pdf
Download File

metalwork_oxy_acetytlene_torch_setup_2024_update.pdf
File Size: 126 kb
File Type: pdf
Download File

Picture
Powered by Create your own unique website with customizable templates.