Casting small ingots
| durston-instruction-maintanence-for-hand-operated-rolling-mills-is.pdf |
Pouring Your Ingot
1) Gather your scrap materials
2) Prep the Oxy-Acetylene and the table area
4) Set up the crucible and ingot mold close together and practice using the tongs with one hand in the same way you will do your pour (watch the video!)
5) Melt down your material with the Oxy-Acetylene and add a pinch of Borax ONLY IF NEEDED. You will want to add a slight "feathered heat" to the mold as well so it isn't hitting a hot
6) Pour and allow to cool for a bit before removing the ingot from the mold.
7) Quench in water using the tongs to hold the hot ingot
8) Inspect for cracks or bubbles in the mold. If not nice solid ingot melt it down and pour again. Try turning up your heat when melting it to ensure there is a better chance of a better pour
Rolling In the Mill
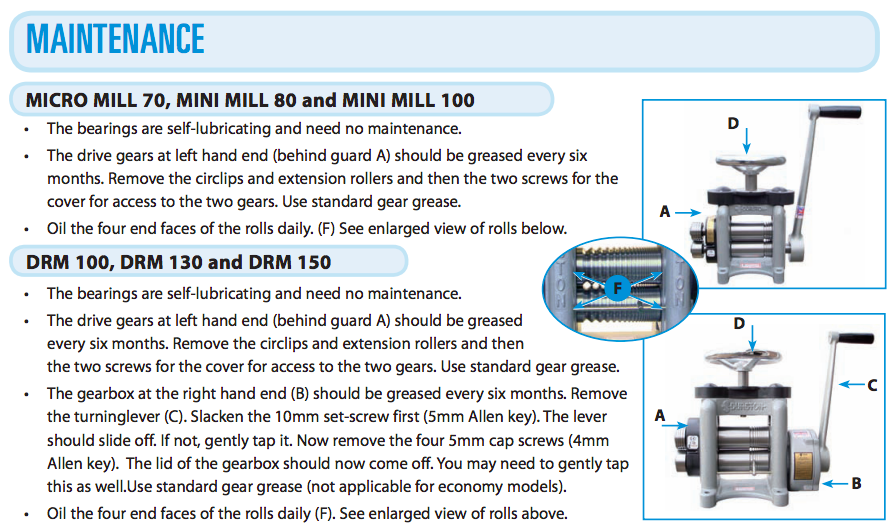
1) Open the space between the two mill rollers with the top adjustment wheel until you can fit your DRY and NOT HOT ingot between the rollers
2) Turn the top adjustment wheel until the mill grabs the ingot and you can use the rolling handle on the side to pull the ingot through
3) Turn the top adjustment wheel between 1/4 and 1/2 a turn and put your ingot through the mill again. You should begin to see the top and bottom of your ingot start to get flat
4) After a couple passes you will need to anneal your ingot again to prevent it from cracking or breaking mid roll. It might have started to curve like a bannana or a strange noodle!
Annealing Your metal
1) Place your ingot on the firebrick again and heat up with the Oxy-Acetylene torch.
2) Feather your metal with the heat. We don't want to melt it, just get it hot enough to soften the metal.
4) You might as well get used to this process since you will probably have to anneal over ten times throughout the process.
Rolling in the Mill Again to get wire! woohoo!
1) Reduce wire by rolling two or three times in each groove, rotating the wire 90 degrees on each pass.
2) Rolls should be nearly closed for last pass before moving to the next groove. Depending on material, passes of up to 30% can be achieved.
3) The material should be annealed as often as necessary to avoid excessive force when rolling.
4) Indications of excess hardness are frayed edges, wrinkling of surface, surface cracking or excessive force needed to turn the rolls
1) Gather your scrap materials
2) Prep the Oxy-Acetylene and the table area
- - fire brick, ingot mold, crucible, tongs, borax, container of waiter for quenching, safety equipment, etc
4) Set up the crucible and ingot mold close together and practice using the tongs with one hand in the same way you will do your pour (watch the video!)
5) Melt down your material with the Oxy-Acetylene and add a pinch of Borax ONLY IF NEEDED. You will want to add a slight "feathered heat" to the mold as well so it isn't hitting a hot
6) Pour and allow to cool for a bit before removing the ingot from the mold.
7) Quench in water using the tongs to hold the hot ingot
8) Inspect for cracks or bubbles in the mold. If not nice solid ingot melt it down and pour again. Try turning up your heat when melting it to ensure there is a better chance of a better pour
Rolling In the Mill
1) Open the space between the two mill rollers with the top adjustment wheel until you can fit your DRY and NOT HOT ingot between the rollers
2) Turn the top adjustment wheel until the mill grabs the ingot and you can use the rolling handle on the side to pull the ingot through
3) Turn the top adjustment wheel between 1/4 and 1/2 a turn and put your ingot through the mill again. You should begin to see the top and bottom of your ingot start to get flat
4) After a couple passes you will need to anneal your ingot again to prevent it from cracking or breaking mid roll. It might have started to curve like a bannana or a strange noodle!
Annealing Your metal
1) Place your ingot on the firebrick again and heat up with the Oxy-Acetylene torch.
2) Feather your metal with the heat. We don't want to melt it, just get it hot enough to soften the metal.
- We are changing the structure of the metal by heating it up. Everytime we pass it through the roller it gets harder so it is important to not rush the project.
4) You might as well get used to this process since you will probably have to anneal over ten times throughout the process.
Rolling in the Mill Again to get wire! woohoo!
1) Reduce wire by rolling two or three times in each groove, rotating the wire 90 degrees on each pass.
2) Rolls should be nearly closed for last pass before moving to the next groove. Depending on material, passes of up to 30% can be achieved.
3) The material should be annealed as often as necessary to avoid excessive force when rolling.
4) Indications of excess hardness are frayed edges, wrinkling of surface, surface cracking or excessive force needed to turn the rolls
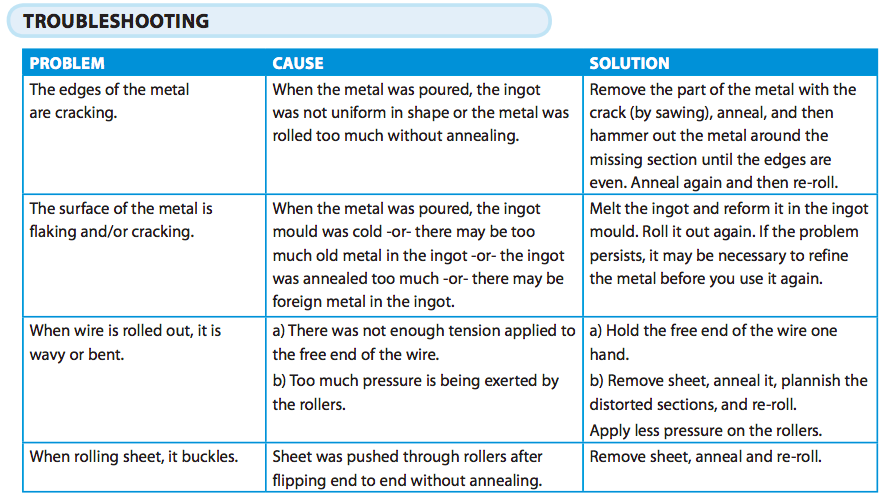
Rolling Mill Troubleshooting
